Scanning Film with a Digital Camera
At one time the measure of a good negative was the ease or difficulty it provided in making a paper print with an enlarger. I still value a B&W negative that prints easily, but in most cases ease of scanning is even more important because the digital representation is the first and maybe only way that other people will see the photograph.
Part of the intrigue of film is that any given piece of film contains a landscape of subtle detail. Part of the reason shooting film is such an odd choice is that for the most part, this detail is inaccessible.
The limitations of consumer grade scanning techniques results that the digital representations are necessarily compromised. When you browse the web page of any good film photographer you will notice the deficiencies in the scans—if you're looking for them. Does this matter? I doubt someone would like their own portrait more if only it were sharper!
Digitizing
For 35mm and medium format I prefer a digital camera over a consumer-grade scanner for several reasons: speed and control over exposure.
To get started with macro photography you'll need a tripod with a reversing post such as the Slik 700DX Pro and a light pad with a high color reproducability such as the Kaiser Slimlite Plano 8x11.
Always use the self-timer or remote to get to get a sharp image. Manual focus works fine, but on mirrorless contrast-based autofocus has served me well. From experimentation it seems that the best depth of field and sharpest on-center for APS-C sensors is around f/8. Keep in mind that at close range (a magnification factor of 1:1.5) the effective aperture is approximately f/11.
Digitizing film is a very demanding task for a lens. For my Fuji, I can confirm that Ken Rockwell was correct when he identified the Fuji XF 60mm f/2.4 ASPH as "optically just about perfect".
Adjustments
In my experience, the first edit is never your final adjustment. Walk away from the computer and come back an hour or a day later. In a way, you are partially blind while making an initial composite. With the passing of time you will almost certainly perceive each frame (and the collection as a whole) differently.
I generally keep Gimp files for two weeks, if I'm still happy with them I
export them as a
tiff
and delete the intermediate files.
Color Reversal
The range of tonal values in a color transparency is very wide, and has a vast landscape of shadow detail. Because of this I always bracket exposure. The concept is to pick up some of the shadow detail by adjusting the opacity of layer "0" over layer "+1", then restore color and detail in the bright areas by merging the underexposed frame using a layer mask.
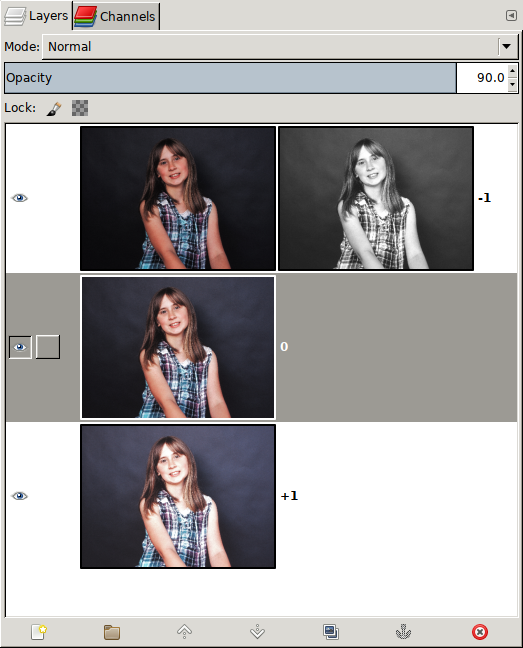
| Layer | Mode | Opacity | Mask |
|---|---|---|---|
| +1 | Normal | 100% | - |
| 0 | Normal | 90% | - |
| -1 | Normal | 50% |
Mask from image on
"+1" layer |
Alternatively I may use this arrangement to create more contrast
| Layer | Mode | Opacity | Mask |
|---|---|---|---|
| +1 | Normal | 100% | - |
| 0 | Normal | 100% | Mask from image |
| -1 | Grain Merge | 20% | Mask from image |
One major advanage of color reversal is that you already have a perfect reference for scanning for adjustments. Keep the film the light table and tweak the image until it looks very close to what your eye can see.
After combining layers clip hilights using levels or curves. Pure white is an accurate representation for transparent areas on the film.